Monitoring your training
 
 
  1. Introduction
  2. Training_by_Feeling
  3. Lactate_Testing
    1. Lactate_testing_during_workouts
    2. Testing_for_Aerobic_Capacity_or_LT
    3. Maximum_Lactate_Test
    4. Interpreting_a_Lactate_Profile_or_Test
    5. Samples_of_Interpreting_a_Lactate_Test
      1. Sample_1
      2. Sample_2
    6. Procedure_for_Testing_Lactate
    7. Assorted posts on Lactate Testing and what they do
Introduction
    One of the often neglected and most difficult things to do is to monitor the progress of your training.  When deciding what kind of training to do, the athlete knows in general terms what is supposed to be going on in the body when he runs at that pace or during that workout.  For example, when doing an anaerobic workout, the athlete knows that he wants to work on his anaerobic system, and therefore high lactate values would be present if he measured them.  Or for Lactate Threshold training, he knows that he should be running right below his lactate threshold, so in terms of lactate he would want to be at a steady state where he is running at a speed that allows him to produce the maximum amount of lactate that can be cleared at the same time, thus his lactate levels are constant, not increasing.  The same examples can be said for measuring with heart rate, by feeling, or any other method. The problem is that we know what is supposed to happen when we perform workouts at the certain intensities, but we really don't know exactly what is happening in our bodies.  That's why it's important to monitor what is going on in your body through a variety of measurements.  These include measuring heart rate, blood lactate values, speed/distance, and by feeling.  Each one of these systems of monitor has it's pros and cons and that is one of the topics of this section.  When and how to use these monitoring techniques to enhance your training.
   
  
Training by Feeling
    Training by feel is one of the easiest and hardest thing to do.  It's easy because it requires no equipment at all.  All that is required is yourself.  The problem with it is it is very subjective and you need to know what you are supposed to feel and when.  There's no read out telling you that you are expending this much effort or you are training in this zone.  It's all subjective.  The athlete needs to learn how to read his or her own body.  They need to know what a recovery run should feel like, what an anaerobic workout should feel like, or what running right below your lactate threshold feels like.  This can very hard to do especially if the athlete is relatively new to sport.  Even for experienced runners, it's a tough task.  I've found that no matter what the experience some runners are better at reading their own bodies than others.  For some reason, some runners have an in grown ability to be able to judge their effort or pace right on, while others couldn't even give you a ball park guess or pace or effort.
    Fortunately, what to feel can be learned to an extent.  Practicing running at various speeds and efforts and paying attention to the different reactions your body has to these various efforts is one way to do it.  You will notice subtle clues that will help you guage effort, such as your breathing or how heavy the legs should feel, or how smooth everything feels.  The key is to experience these things and practice it.  But even if someone describes to you how it is supposed to feel during various efforts, how are you supposed to know if you are right on?  That is where the other monitoring tools come in.  Lactate testing or heart rate monitoring can be used as TOOLS to help tell you exactly what is happening in the body to the muscular system and cardiovascular system.  You can use these two things to check and see if your feeling for running at such things like lactate threshold is correct.  By measuring lactate the first couple of times to make sure you are in the correct zone, you can start to understand what it feels like to run at this zone, and soon measuring of lactate every time becomes unnecessary and you can reduce the amount of times that you test yourself to just enough where you check every once in a while to make sure you are still running at the correct pace and effort level.
    Training by feeling is the most logical way to train for most runners.  The athlete needs to learn how to read his body, so that he knows what kinds of effects are taking place.  Teaching an athlete this can be difficult at first, as it is hard to describe in words what he is supposed to feel.  The more often the athlete runs at a particular effort, the better he or she should get at being able to find this effort during a workout or race.  But first establishing what the effort feels like can be difficult and the use of watches, lactate measurements, or a heart rate monitor can be effective teaching instruments used to get the athlete more in tune with running by feel.

Lactate Testing
    Lactate testing is one of the more controversial things out on the market now.  It is generally more widely accepted in sports such as cycling (Lance Armstrong most notably) and swimming, than it is for running.  Running purists will say that back in their day they never needed blood samples to tell them how hard they were training, or they will cite the kenyans as never using lactate tests.  Others will say that it is too invasive as it requires a prick of the hand or ear to draw blood from the athlete.  These are sensible arguments and have some merit, but like running with a watch or with a heart rate monitor, lactate testing has its place as long as it is used as a tool and you don't become too dependent on it.

Lactate testing during workouts
    The basis of lactate testing is that it can give you a precise measurement on what is going on inside your muscles as you run.  It provides a number that tells you how much stress is being placed on the muscles in your body.  For instance, it can give you a good indication on what energy systems the current workout is using.  In general, the lower the lactate values, the more aerobic the exercise is, and the higher the levels the more anaerobic it is.  Because of this, it is a good tool to use to get the athlete familiar to training in various training zones.  If you want to train at a high end aerobic zone, such as right below the lactate threshold, and you have done a lactate threshold test (see LT test section) to determine where your LT occurs, then you can use lactate measurements to see if you are running at the correct level or not.  For instance, if your LT was found at 4.0mmol, and you do a session of 6x6min of LT repeats and you want them just below your LT to get maximum aerobic stress without getting anaerobic, then you can test yourself between the repeats to make sure the lactate levels are .3-.5  below 4.0mmol².  So if you see a series of lactate values of 3.5, 3.6, 3.6, 3.7, 3.8 then you know you ran at the right effort.  While if after the first effort you see 4.1, you know you need to adjust the pace and effort to fit the goal of the workout.  Also, if you plan on doing 6, and after the 5th one, you see your lactate values raise from 3.8 to 4.2, then you know it's probably good to call it a day.
    In addition to using Lactate testing during threshold work, it can also be used to measure the anaerobic stress put on the muscles.  Using the same athlete above who has a lactate threshold of 4.0, you know that anything above 4.0 will be taxing the anaerobic system more and more.  Just like in the aerobic system where you have low end, medium, and high-end aerobic running, you have the same in the anaerobic system.  In the anaerobic system, low-end anaerobic might be 4.0-7.0, medium 7.0-10.0, and high 10.0 and higher.  These are just theoretical values and vary from person to person, but they are intended to show you that you can work the anaerobic system at different levels just like the aerobic system.  This is important because the dangers of too much anaerobic work are well documented (see training section).  Too much can cause overtraining, lower the pH too far, decrease the aerobic capacity, etc.  Therefore monitoring your training to make sure that you only tax the anaerobic system fully every once in a while is invaluable.  But, just as too much anaerobic can be harmful, neglecting the anaerobic system can be dangerous too.  Extended periods of time without doing any anaerobic work will obviously decrease the anaerobic capacity, which can be detrimental to middle distance runners expecially, and lead to an inability to handle much intensity or work load.  If you read the training section, you will note that I stress a balance of training where no system is neglected for extended periods of time.  This applies to the anaerobic system.  But, it is not smart to overly tax the anaerobic system when the goal is to develop the aerobic system, like during a base phase.  So instead of working to improve the anaerobic system, you are simply trying to maintain it, or keep it in check and "hyped" up. This can be accomplished through a variety of ways discussed in the training section (hills, sprints, strides, pace work,etc.) During this period of time, you don't want to be doing high end anaerobic training as that would not give you the results you wanted.  Therefore, lactate testing can be used to make sure that the lactate values do not get too high during an anaerobic maintenance workout.  In addition to this, you can check to make sure that lactate is being cleared relatively fast.  An example of using lactate testing for anaerobic workouts during the base period is if the athlete is doing 200m hill repetitions and he wants to maintain the anaerobic system.  If he'd doing 8 of them, he can check his lactate levels after each one if he wants, or after every two or three to be less invasive, and to make sure that his lactate levels do not get too high, because the higher the lactate values, the more stress put on the anaerobic system.  Just like in testing for lactate threshold, if the values get too high he can know when to call the workout quits, and not stress his body beyond what is desired.
In addition to monitoring lactate values during workouts, lactate testing provides a good way to check the progress of several key physiological keys to training, such as aerobic and anaerobic capacity.

Testing for Aerobic Capacity (or LT)
    One of the best uses for a lactate test is to monitor training using a test for aerobic capacity.  Many times people use a test for the Lactate threshold to do this, which is one of the common tests done using a lactate measurer.  It is a relatively simple test that can be varried from person to person.  In general, it is suggested that you run between 4-6 repeats at varying paces over a distance that takes between 5-8 minutes.  If you are trying to figure out your LT, then you should reach your LT on around the 3rd-4th repetition.  The pace starts out at a moderate aerobic run pace and then increases each repetition until the last one is at around 5k pace.  The rest in between should be relatively short and usually consists of the amount of time it takes for you to take the lactate measurement (60-90secs).
    So, if your theoretical lactate threshold (found based on your PR's at various distances) is 11mph(5:28 mile), then your LT test may look something like this¹:

Distance
Pace per mile
Speed in Miles per Hour
Hypothetical Lactate Values
1mile 6:20 9.5 mph 2.0
1mile 6:00 10 mph 2.2
1mile 5:43 10.5 mph 2.4
1mile 5:28 11 mph 2.7
1mile 5:13 11.5 mph 3.9
1mile 5:00 12 mph 5.5

You would then plot this data on a graph and get a lactate curve.  This athlete LT would occur somewhere between 11 and 11.5mph because the lactate value increased substantially by more than 1.0mmol between these two speeds.  To find a more exact number, you would use the graph you plotted.  You would draw a line connecting the 11.5 and 12mph points and continue that line downwards so that it continues on down past the 11.5mph point.  Then you would do the same thing with the 10.5 and 11mph dots.  Connect them, and continue the straight line to the right past the 11mph dot.  Where the two extended lines connect that you just drew is your lactate threshold.  Draw a straight line down from this point and you will get a speed that this LT should occur at.  You would then use this LT to give an estimate of your aerobic capacities.  It can then be compared every so often to see what effects your training have on your aerobic capacity.  To get a full understanding you would have to do an anaerobic Capacity test (maximum lactate) since the anaerobic capacity effects the aerobic capacity.
    You don't necessarily have to find the LT in order to monitor aerobic capacity.  The key is the procedure for finding the point has to be the same every time.  For this reason you can used a fixed point on the curve instead of the LT.  This fixed point such as a V4 (Velocity at 4.0mmol) is much easier to find but does NOT represent a LT.  Instead this fixed point can be evaluated from test to test just as an LT point would to see if it is increasing or decreasing. 

Maximum Lactate Test
    A maximum lactate test is used to see the maximum amount of lactate that you can produce in a single repetition, which in turn gives you a good idea of your anaerobic capacity.  When done in conjunction with a lactate threshold test it can provide very valuable information (more on this in interpreting lactate tests).  To perform a max Lactate test, simply run all out for a duration of between 40 and 90seconds, or a 400-600m trial works well for most people.  After this is done, then measure lactate levels in two minute periods until you see a drop in lactate.  This must be done because lactate will continue to rise for about 2-5 minutes after a max effort, so you must measure every 2 minutes to find the highest value.  Most people find it useful to do this kind of test at the same time as the above mentioned lactate threshold test.  After the threshold test is done, recover, then do a 600m all out and record the maximum lactate.  This gives you a more complete lactate profile that will tell you several different things in one graph.  Without knowing the maximum lactate you can produce, than incorrect assumptions can be made based on only a lactate threshold test.

Interpreting a Lactate Profile or Test
    Let's assume that you have done a Lactate Threshold test and followed that with a maximum lactate test.  You graph this information and it gives you several things that can be useful such as your maximum lactate (anaerobic capacity), and your lactate threshold, which shows how good your aerobic conditioning is.  The real benefit in using these tests isn't in testing just once, but testing periodically throughout the training cycle to see improvements and changes in the two aspects mentioned above.  With periodic testing, you can compare the newer test results to the previously done ones and see if any changes took place.  This will help tell you if your training was effective or not.  For example, if you are working on improving your lactate threshold in the base period, and you do a test at the beginning of the period and then another one 6 weeks into the period, and the lactate curve shifted to the right without a decrease in the maximum lactate, then you have effectively improved your lactate threshold and the training worked.  However, if no shift occured and your LT occured at the same pace and with the same amount of lactate, then the training was not effective and you must alter something to get the desired effect.  The same example can be used in reference to anaerobic capacity.  If you are doing anaerobic workouts to improve your anaerobic capacity, then you can see this in the test results too.  Also, you can monitor to see if you are doing too much anaerobic work with not enough aerobic support if your anaerobic capacity increases, but the lactate threshold shifts to the left, showing a decrease in aerobic abilities.
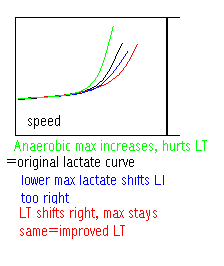
    It was previously thought that a shift to the right in the lactate curve was always a good thing.  However, a shift to the right does not always mean that you have improved your LT.  This is because a decrease in your maximum lactate (anaerobic capacity) can cause a shift in the right, but this will not always help performance, because especially in middle distance running, a high anaerobic capacity is required.  The opposite is true too.  Too much anaerobic work can improve your anaerobic capacity, but shift the graph to the left because it decreases the aerobic abilities.  You know that the LT has really been improved when the graph shifts to the right while the max value stays the same or increases.  I know this is all confusing, so hopefully this graph will help you visualize it.
Lactate Graph
The black line is the original lactate curve and the others show what else can happen.  In the green line, the anaerobic capacity has increased (the maximum lactate increased) and thus hurt the lactate threshold as it has shifted to the right.  In the blue line, the lactate threshold has shifted to the right slightly but this is a result in the decreases in anaerobic capacity, because the maximum lactate value was less.  In the red line the maximum lactate value has stayed the same, but the line has shifted to the right, indicating an improvement in the Lactate Threshold due to training.  Not shown is a shift to the right in the graph and an increase in the maximum lactate, showing improved LT and improved anaerobic capacity.
    The desired result for the graph depends on what the purpose of training is at the time.   For instance, if you are a marathoner than the graph and shifts you want to take place are much different than if you are a 1,500m runners.  In the marathoners case, a decrease in anaerobic capacity, such as in the blue line, might be a desirable thing.  In the 1,500m runners case, a decrease in anaerobic capacity might be bad, while a shift such as in the red line with the same anaerobic capacity or even an increased anaerobic capacity would be good.  In addition to you wanting different results in the lactate curve for different events, you also want different results during different training phases.  A slight drop in the anaerobic capacity for a 1,500m runner might occur during an extended period of base work, and this is alright, but the key is not letting it drop so far that you can not build it back up during an anaerobic phase (thus maintenance workouts come in.)  Also, during an anaerobic phase for a middle distance runner, where you are trying to increase the anaerobic capacity, then the lactate threshold might stay constant, and this is fine during this period.  But it's important not to let too much anaerobic work hurt the aerobic system too much, so if you see too much of a shift to the left in the lactate threshold, then you know you need more aerobic support work during the anaerobic phase.  This is the art of coaching and trying to find a balance bvetween the two energy systems to reach the desired results.  This is where knowing what you are testing for and what you are trying to change in training comes in.  In order for lactate testing to be effective, you have to know what causes different shifts and increases and decreases.  You must also know what you are trying to accomplish in training.  These periodic tests (every 5-6 weeks or so) will help you decide if the training prescribed is giving the desired effects for the distance you are training for.
    Just one more important note.  If a maximum lactate test is not done and only an LT test, you can now see where you might think that you have increased the LT, but in actuality the LT increase was caused by a decrease in the anaerobic capacity.  That's why it's important to use both tests to get a full picture of what is going on.
    To sum up the changes that can take place in the graph, I will quote letsrun.com (http://www.letsrun.com/forum/flat_read.php?thread=806863&page=9) as they put up a good summary of Jan Olbrecht's ideas in why the graph can shift to the right or left:
      A shift to the left in the lactate curve COULD be caused by:
1. poorer aerobic capacity combined with unchanged anaerobic capacity
2. poorer aerobic capacity combined with improved anaerobic capacity
3. much poorer aerobic capacity combined with poorer anaerobic capacity
4. unchanged aerobic capacity combined with improved anaerobic capacity
5. improved aerobic capacity combined with much improved anaerobic capacity
No shift in the lactate curve COULD be caused by:
6. poorer aerobic capacity combined with poorer anaerobic capacity
7. unchanged aerobic capacity combined with unchanged anaerobic capacity
8. improved aerobic capacity combined with improved anaerobic capacity
A shift to the right in the lactate curve COULD be caused by:
9. improved aerobic capacity combined with unchanged anaerobic capacity
10. improved aerobic capacity combined with poorer anaerobic capacity
11. much improved aerobic capacity combined with improved anaerobic capacity
12. unchanged aerobic capacity combined with poorer anaerobic capacity
13. poorer aerobic capacity combined with much poorer anaerobic capacity

Samples of Interpreting a Lactate Test
Sample #1:
Test #
Lactate Threshold speed (pace per mile)
(aerobic Capacity)
Max Lactate Value
(Anaerobic Capacity)
Test 1
5:00
9.0 mmol
Test 2- 6 weeks later
5:05
13.0 mmol
Test 3- 6 weeks after test 2
4:55
13.0mmol
    Interpretation: After Test #1 it was seen that the athletes maximum lactate value (anaerobic capacity) was too low for a middle distance runner.  His LT was alright, but still had room for improvement.  So the next period of training was spent trying to maintain the lactate threshold, with the emphasis being on increasing his anaerobic capacity.  Test #2 revealed that the athlete had substantially improved his Anaerobic Capacity, but his Lactate Threshold had slowed slightly.  This is okay for right now because the athlete accomplished the most pressing goal and emphasis (the anaerobic capacity).  Now that the athlete has increased his anaerobic capacity to a decent level, emphasis is put on improving his LT while maintaining his newly built up Anaerobic Capacity.  Test #3 shows that the athlete has improved his Lactate Threshold substantially while maintaining his Anaerobic Capacity.  This means that the training accomplished exactly what we wanted.  This is an example of an ideal response to the training, but even if his max lactate had decreased slightly (let's say to 12.0) while his Lactate Threshold still improved to the current levels, the training was still succesful.  The athlete had managed to improve his LT by 5 seconds and his max lactate by 3 mmol from the original test.

Sample #2
To give you a brief example of how this works, lets use a theoretical runner for a second.
To make an objective analysis, let's use a lactate curve. In this curve the runner has a relatively small or non significant increase in lactate with increasing intensities, until at around some effort level the line starts increasing significantly and then rises relatively steep. To analyze aerobic capacity, we use the V4 (velocity at 4.0mmol) to compare from one test to another. Also, after the test and significant rest a maximum anaerobic capacity test is done where the athlete runs all out for 400m and then the highest lactate value is found.
The theoretical results:

test #1:
V4: 4:50 mile pace
Max Lactate: 15.0mmol

Test #2, 6-weeks later:
V4: 5:00 mile pace
Max Lactate: 17.0mmol

By looking at the V4, it looks like his aerobic capacity has decreased, but when you see that his anaerobic capacity has increased, this tells you that the rise in the anaerobic capacity (from doing anaerobic capacity workouts) is what caused the V4 pace to slow down. This is because the athlete has a better anaerobic capacity, therefore he will produce more lactate at every level. In reality his aerobic capacity probably stayed the same, but the increase in the anaerobic capacity "hurt" his aerobic capacity.

This athlete would probably run a better 800 and probably 1500 after test #2 because it has a significantly higher anaerobic component. The athlete would have probably run a better 5k/10k after test#1

Anaerobic capacity work will increase the max lactate (anaerobic capacity), this will cause more lactate to be produced at every effort level, thus the V4 is slower, even if the aerobic capacity did not change.

Another example is doing too much aerobic work can lower the anaerobic capacity. For example if the athlete does lots of long distance running or LT running with very little fast stuff, then the following may occur to our runner:

test #1:
V4: 4:50 mile pace
Max Lactate: 15.0mmol

Test #2, 6-weeks later:
V4: 4:40 mile pace
Max Lactate: 13.0mmol

He lowered his anaerobic capacity, in order to have a better V4 and produce less lactate at every level. This athlete would probably run a better long distance event (10k) now.


So as you can see, neither is necessarily bad. It's about balance and deciding what your event takes and needs.

In general, you always want to maximize the aerobic capacity. The anaerobic capacity must not be maximized but optimized or balanced for your specific event.


Procedure for Testing Lactate
    I've had several people inquire about how to test for lactate, so I decided I'd post a quick explanation of how I go about doing it and what you need.  I am not suggesting that every runner should go out and spend a lot of money to test for lactate.  In most cases, it is not needed.  It can however be a very useful tool, but the key is knowing how to use it and interpreting it.  If you plan on using lactate testing for yourself, plan on doing a lot of reading and researching the topic (If you would like to know where to get started on what to read for additional research e-mail me).  Just to get the point across, it should be used as a training aid, like a watch or heart rate monitor, do not become a slave to it.  Now that that is out of the way here is a brief overview of what you need and how to test yourself.
    The most important thing needed is the actual testing device itself.  There are several different models of lactate testing devices (some examples on the internet can be found at lactate.com and lacctate-pro.com).  I use the Lactate-pro device myself.  The device itself looks and functions a lot like the machines that you have probably seen many diabetics use to monitor blood sugar levels.  In addition to the device, you will need testing strips, a lancet (think of it as a little needle poking thing, it pricks the finger so that you can take a blood sample), some alcohol wipes, and some plain cotton wipes to wipe sweat and blood off.
    When first testing it's helpful to have someone else assist you but it can be done by yourself.  The more practice you get at testing yourself, the easier and quicker you become.  As far as testing , the process goes something like this for the lactate pro device.  First off, when you first use the device you insert a test meter strip that makes sure that the device is working properly and it will give you a reading that should be within the parameters specified on the test meter strip (usually somewhere around 2.0mmol).  This only needs to be done once a month or so to make sure the testing devices is working properly.  Everytime you use a new box of test strips (boxes contain 25 strips) then you need to insert a calibration strip before testing is done which calibrates the device to that particular box.  Once this is done, you are ready to start testing.  The procedure is as described below:
  1. Peel back foil packet that contains test trip enough to where you can insert the side that it goes in the device while leaving the foil covering the part where you apply blood to.
  2. Insert test strip with foil covering half of it into the device until it turns on.
  3. Use alcohol wipe to wipe finger which you will be drawing blood from.
  4. Use lancet device to prick finger (experiment with how deep of a prick you need to make.  I found I needed to make the deepest incession, but that's not always the case.  NO, it does not hurt. more on this later.)
  5. Once finger is pricked wipe the area with a dry wipe to get rid of sweat and wipe the first bit of blood that comes out because if sweat is in the blood it can give a false reading.
  6. Uncover entire testing strip and hold finger to the edge of the strip and squeeze finger to get blood to come out.
  7. The blood should fill the testing strip all the way to the + sign.
  8. The device will then start a 60second count down timer.  At the conclusion of this it will give you your blood lactate reading.
  9. Wipe blood off finger using wipe.
Just a couple of quick comments.  If you have someone helping you, you can also take blood samples from the ear and it's supposed to be almost pain free and you only have to prick it once and can reopen the same spot.  However, I usually do mine myself, so I have to use the finger.  I prick my left hand since I'm right handed and it really doesn't hurt at all. I was kind of worried the first time I did it (I mean who likes making themselve bleed.)  However, you really don't feel much at all.  You feel the prick but that's about it.  It really doesn't hurt the day after either.  Once I had to prick my pinky finger 4 different times because I messed up (my first time doing it) and the day after I could lightly feel  small bruising, but only if I really pushed down on my pink with all my force.

Sources, footnotes:
1-Advanced Marathoning by Pete Pfitzinger
2-MariusBakken.com
3-The Science of Winning by Jan Olbrecht

Assorted posts on Lactate Testing and what they do:
In this section you will see assorted posts(either on message boards or to people who have e-mailed me) by me explaining  what lactate testing does.  These are provided to help other readers who have similar questions.

Value of Lactate Testing
The value of measuring lactate is that it gives you a pretty clear idea of what stress is put on the MUSCLES.  It gives you an idea of the aerobic and anaerobic contribution and how they interact during running.

It is highly valuable, but you must spend time to learn beyone what is written in the popular literature and by many sports scientists.  In fact most sports scientists interpret lactate testing WRONG.

Yes it sounds arrogant of me to say this, but they actually do.

Lactate testing is immensely helpful (for a high level runner) in monitoring the changes that take place in the body from period to period.

Let me give you a quick example here.  I use a lactate test every six weeks to measure Aerobic Capacity and Anaerobic Capacity, plus a test of Lactate Clearance which gives me a secondary idea of the Aerobic system and clearance rates.

I'm a marathoner and after doing this test, my anaerobic capacity was high.  I am using the anaerobic system too much at all levels because it is decently developed.  Because of this, my lactate levels are higher at every effort level than I'd like.  Because in the marathon I'm concerned with glycogen depletion and want to use as little as I can over a long period to conserve it, I want to lower these lactate levels which correspond to carbohydrateutilization at every level.  Thus I set out for 6 weeks of training aimed at lowering the Anaerobic Capacity, and thus artificially enhancing my LT (even though my aerobic capacity probably stays the same).  This lowering of the Anaerobic Capacity, will mean less lactate at every effort level.

6 weeks later I retest my aerobic and anaerobic capacities.  I notice that my anaerobic capacity has lowered, and because of this I produce less lactate at every effort level, and my Lt pace has artificially increased because of this.  NOW I'm able to run longer while using less glycogen.  And should race my marathon soon.

However, if after 6 weeks of training to lower my anaerobic capacity, the anaerobic capacity only changed slightly.  Then I now know that I Did NOT respond the way I thought I would to the particular training done to lower my AnCap.  Thus I have to try something different to get the desired change. 

See, lactate testing helps measure the effects of TRAINING on your body.  After several months of testing, you get a clear idea of what certain workouts do to your body.